Case Master Pro
  • Home
  • Software Features
    • Case Management
    • Billing & Accounting
    • CMP Imaging
    • Administration
    • Security
    • Reporting
    • Document Management
    • Software Integration
  • Add-ons
    • Email Automation
    • Integrated Payments
    • Client Dashboard
    • Payment Dashboard
    • Outside Counsel Login
    • EDI Interfaces
    • Direct Check Module
    • Data Conversion
  • Resources
    • Help Documentation
    • Help Videos
    • Support
    • Debt Collection Blog
    • Solutions and Pricing
    • Software Enhancements
  • About Us
    • About Case Master Pro
    • Testimonials
    • Contact Us
  • Free Demo
Select Page

General Case Management

40
  • Abbreviations
  • Adding a Legal Status
  • Adding an Opponent / Debtor
  • Adding and Using Review Codes
  • Adding Hold Codes
  • Adding Multiple Images to an Activity Note
  • Adding New Activity Codes
  • Adding Wage and Bank Garnishments
  • Additional Opponent / Debtor Screens
  • Case File Basics
  • Checking for Conflict Files and Problems
  • Counties, Clerks, and Court Locations
  • Creating a New Case File
  • Creating a New Client (Part 1 of 2)
  • Creating a New Client (Part 2 of 2)
  • Creating and Assigning Reviews to a User Group
  • Daily Dashboard
  • Data Mining: Propensity to Pay
  • Data Mining: Suggest Next Action
  • Editing Bad Phone Numbers and Addresses
  • Favorites Feature
  • Field Change History (Audit Log)
  • File Status Codes
  • File Tags
  • Financial Calculator
  • General Navigation Menus and Buttons
  • Image Sharing
  • Imaging (Paperless Office)
  • Importing New Files
  • Litigation Screens
  • Misapplied Debtor Payments
  • Opponent Declares Bankruptcy Procedure
  • Opposing Attorneys
  • Payment Arrangements
  • Renumbering or Deleting a Case File
  • Returned Mail Feature
  • Status Bar
  • Understanding Settings Hierarchy
  • User Preferences
  • Workflows

Security

4
  • External Users
  • Resetting Passwords
  • Security Features
  • Two-Factor Authentication

Add-Ons

3
  • Adding an Enhanced Email Signature
  • Enhanced Email Automation
  • Microsoft Outlook Add-On

Document Management

11
  • Adding a Signature
  • Advanced Document Generation
  • Basic Document Generation
  • Batch Documents
  • Building Document Expressions
  • Creating Spreadsheet Templates
  • Document Fragments
  • Document Generation Selection Options
  • Document Letterheads
  • Document User Prompts (Ask Fields)
  • Merging PDF Templates

Accounting

23
  • Accounting Reports
  • Adding Costs and Expenses to Retain
  • Adding Wage and Bank Garnishments
  • Adjusting Commercial Rates and Suit Fees
  • Balance Calculation Basics
  • Changing Print Scale When Printing Checks in CMPOnline
  • Contingency Rates and Buckets
  • Entering a Balance Adjustment
  • Entering and Printing Checks
  • Entering Client Invoice Payments and Unpaying Bills
  • Entering Deposits
  • Financial Calculator
  • Generating a Client Remittance Report
  • How to Set Up and Enter Hourly Billing
  • Misapplied Debtor Payments
  • Post Direct Payment to Client
  • Preparing and Finalizing Bills
  • Searching for Checks
  • Transactions Check Register
  • Transferring Funds
  • Trust Account Reconciliation Procedure
  • Unfinalizing, Editing, and Reprinting Bills
  • Void Checks

Preferences

4
  • Adding Top Buttons to Grids
  • Enabling Pop-Ups
  • Resetting Passwords
  • User Preferences

Administration

16
  • Abbreviations
  • Adding a Legal Status
  • Adding and Using Review Codes
  • Adding New Activity Codes
  • Assigning Attorney Bar Numbers
  • Automations
  • Batch Internal Status Updates
  • Company Settings: Company Tab
  • Customizing Case Types
  • Image Restore
  • Reassigning Reviews, System Users, and Default Users
  • Renumbering or Deleting a Case File
  • Resetting Passwords
  • Status Bar
  • Terminology
  • User Defined Fields

Tools

7
  • Adding a Legal Status
  • Custom Reporting
  • Data Mining: Propensity to Pay
  • Data Mining: Suggest Next Action
  • Importing Batch Images
  • Importing New Files
  • Reassign or Copy Custom Reports

CMPOnline Support

1
  • SOS Support Line Access Instructions
View Categories

Unfinalizing, Editing, and Reprinting Bills

AI Doc Summarizer Doc Summary
AI Doc Summarizer Thinking Thinking

Overview

This guide shows you how to unfinalize, edit, and reprint invoices in CMPOnline. Keeping your billing ledger accurate is important, so use these step-by-step instructions whenever you need to fix billing mistakes or manage updates.

Unfinalizing a Bill

Unfinalizing allows users to reverse a finalized bill back to an editable format. This is necessary when an invoice contains errors that must be resolved.

  • Navigate to Accounting > Billing > Open Bills.
  • Locate the bill needing modification.
  • Click the Unbill button.
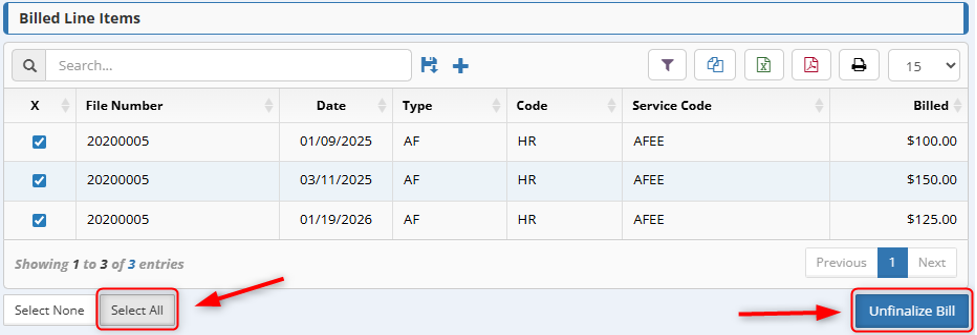
  • From the grid, check the entries needed, or choose Select All to unfinalize the entire bill.
    Note: If you need to edit a bill, we highly recommend selecting all items to unbill. However, if you just want to delete a specific entry entirely, you can unbill only that single item, delete it, and then reprint the bill.
  • Click Unfinalize Bill and confirm by clicking OK.
Unfinalizing Editing and Reprinting Bills in CMPOnline

Editing and Rebuilding Invoices After Unfinalizing

Once items have been successfully unfinalized, they return to the unbilled ledger where they can be corrected or deleted.

To Edit entries

Note: Again, it is advised to unfinalize all billing entries prior to this step.

  • Navigate to Case File > Financial > Billing > Unbilled.
  • Select the entry and click edit to modify.
  • Once all entries have been edited accordingly, print the bill with your adjustments by navigating to Accounting > Billing > Print Bills and verify accuracy.

To Delete entries

  • Navigate to Case File > Financial > Billing > Unbilled.
  • Select the entry and click the delete button.
  • Once all entries have been deleted, reprint the bill by navigating to Accounting > Billing > Open Bills and verify accuracy.

Void Finalized Bills

Once a bill has been voided, it will no longer be considered an active bill and will be excluded from billing processes and reports.

From the Case File Menu:

  • Navigate to Case File > Financial > Billing > Billed.
  • Select the bill you wish to void, then click Void Selected Bill in the bottom left corner of the grid.
  • When the Void Bill? confirmation window appears, click OK to complete the process.
  • Verify that the bill status has been updated to ensure the bill was successfully voided by navigating to Case File > Financial > Billing > Voided.

From the Accounting Menu:

  • Navigate to Accounting > Billing > Open Bills.
  • Find the finalized bill you wish to void, then click the Other drop-down menu and select Void.
  • When the Void Bill? confirmation window appears, click OK to complete the process.
  • Verify that the bill status has been updated to ensure the bill was successfully voided by navigating to Accounting > Billing > Voided Bills.

NOTE: If you need to restore a voided bill, navigate to Accounting > Billing > Voided Bills. Locate the bill you wish to restore and click Un-Void next to the bill. Once the bill has been un-voided, it will be returned to the Accounting > Billing > Open Bills screen and will again be available for normal billing processes.

Client Billing, Client Correspondence, Client Invoicing, Client Payments

Share This Help Document:

  • Facebook
  • X
  • LinkedIn
Table of Contents
  • Overview
  • Unfinalizing a Bill
  • Editing and Rebuilding Invoices After Unfinalizing
    • To Edit entries
    • To Delete entries
  • Void Finalized Bills
    • From the Case File Menu:
    • From the Accounting Menu:

CMPOnline by Case Master Pro
P.O. Box 252
Georgetown, FL 32139
phone: (386) 675-0177

Contact Us

  • Facebook
  • LinkedIn
  • YouTube
  • Twitter
  • RSS

Software Features

  • Case Management
  • Billing & Accounting
  • CMP Imaging
  • Administration
  • Reporting
  • Document Management
  • Software Integration

Add-on Features

  • Email Automation
  • Payment Processor Integration
  • Client Dashboard
  • Payment Dashboard
  • Outside Counsel Login
  • EDI Interfaces
  • Direct Check Module
  • Data Conversion

Discover the Features Every Law Firm Needs

  • About Our Legal Case Management Software Company
  • Case Management Software
  • Debt Collection Software with Custom Reporting
  • Legal Billing Software
  • Legal Software Administration
Copyright © 2005-2026 Case Master, Inc. All rights reserved.