Overview
This document details how to import images in a batch using CMPOnline. This process requires a specific naming system for images, so before zipping the file, ensure your images follow the conventions specified in the first section of this document. Images also cannot be imported for multiple clients in one single session. If you have images you wish to import for multiple clients, repeat these steps for each client individually. If you have any questions regarding this process, please contact a CMPOnline representative for assistance.
Naming Images
As mentioned in the introduction of this document, images imported in this process must be named according to a few specifications in order to be added to the correct files.
All image names MUST contain one of the following identifiers. Use the same identifier in all file names within the same zip folder.
- File Number
- Client Reference
- Account Number
- Debtor Full Name
Image names may also include any other identifying information needed for personal identification or description. This other information should be separated within the file name by either a space, hyphen, or underscore. Later in this process, this will be referred to as the separator. Same as choosing an identifier, use the same separator in all file names within the same zip folder.
Later in this document, you will also need to identify the section of the file name the identifier is found in. The section refers to where the identifier is in relation to the other information within the name. For example, in “2023001_Collection Letter”, the identifier is in the 1st section, while in “Collection Letter_20230001”, the identifier is in the 2nd section. Same as choosing an identifier and separator, ensure that the identifier is in the same section of the file name for every file.
Examples of Correct File Names
| File Name | Identifier | Separator | Section of Identifier |
|---|---|---|---|
| 20230001 Collection Letter | File Number | Space | 1 |
| Collection Letter_20230001 | File Number | Underscore | 2 |
| PDF-20230001-Collection Letter | File Number | Hyphen | 2 |
| Demand Letter Updated 1067 | Client Reference | Space | 4 |
| Demand Letter-Updated-1067 | Client Reference | Hyphen | 3 |
| John Doe_Research | Debtor Full Name | Underscore | 1 |
Subfolders
Subfolders allow you to organize images while adding them in a batch. Within this process, name subfolders are the same as naming images, with an identifier, section, and separator.

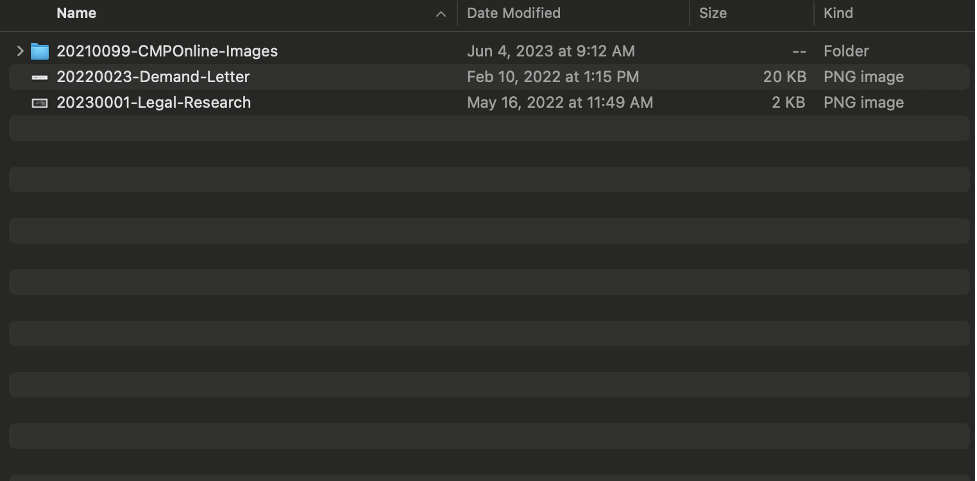
As we can see in the example above, we have two images and a folder. The two images are named as discussed before, meaning they will be uploaded to files 20220023 and 20230001 respectively. The folder in this example is also named correctly, with the file number located in the first section of the name separated by hyphens.
All images within this folder, no matter their name, will be uploaded to the file indicated by the subfolder name. In this case 20210099.
Zipping Folders (Windows)
Once all files in the folder you wish to import are named appropriately, we can continue by zipping the folder. These instructions detail how to complete this using a Windows computer. For Mac instructions, view the section below Zipping Folders (Mac).
- Locate the folder that you want to zip.
- Right click on the folder, select Send to, and then select Compressed (zipped) folder.
A new zipped folder with the same name is created in the same location. To rename it, press and hold (or right-click) the folder, select Rename, and then type the new name.
Zipping Folders (Mac)
Once all files in the folder you wish to import are named appropriately, we can continue to zipping the folder. These instructions detail how to complete this using a Mac computer. For Windows instructions, view the section above Zipping Folders (Windows).
- Locate the folder that you want to zip.
- Right click on the folder, select Compress “Folder Name”.
A new zipped folder with the same name is created in the same location. To rename it, right click on the folder, select Rename, and then type the new name.
Importing Zipped Files into CMPOnline
Before continuing, please ensure all steps above have been completed, including naming the images and zipping the folder correctly.
- Navigate to Tools > Data Import > Imaging.
- Either drop the zipped file into the blue box or click within the box to select the file from your computer.
- Click the green Next button.
- Select the client whose files you will be uploading the images to from the Client drop-down.
- Select the case file identifier you chose within the Naming Images section of this document from the Case File Identifier drop-down. (File Number, Client Ref., etc.)
- Select the separator you chose within the Naming Images section of this document from the Separator drop-down. (Space, Hyphen, or Underscore).
- Select the section that the identifier is found in from the Section drop-down.
- If you wish to add a description to all images, select that description from the Image Description drop-down. (This description will be applied to ALL images uploaded within the batch.)
If you wish to add a review with this batch:
- Select the review you wish to add from the Review Code drop-down.
- Add a description.
- Select the user you wish to assign the reviews to.
If you wish to add an activity code with this batch:
- Select the activity code you wish to add from the Activity Code drop-down.
- Add or edit the description as needed.
- Click Import in the top right of the application.


