Case Master Pro
  • Home
  • Software Features
    • Case Management
    • Billing & Accounting
    • CMP Imaging
    • Administration
    • Security
    • Reporting
    • Document Management
    • Software Integration
  • Add-ons
    • Email Automation
    • Integrated Payments
    • Client Dashboard
    • Payment Dashboard
    • Outside Counsel Login
    • EDI Interfaces
    • Direct Check Module
    • Data Conversion
  • Resources
    • Help Documentation
    • Help Videos
    • Support
    • Debt Collection Blog
    • Solutions and Pricing
    • Software Enhancements
  • About Us
    • About Case Master Pro
    • Testimonials
    • Contact Us
  • Free Demo
Select Page

General Case Management

38
  • Abbreviations
  • Adding a Legal Status
  • Adding an Opponent / Debtor
  • Adding and Using Review Codes
  • Adding Hold Codes
  • Adding Multiple Images to an Activity Note
  • Adding New Activity Codes
  • Adding Wage and Bank Garnishments
  • Additional Opponent / Debtor Screens
  • Case File Basics
  • Checking for Conflict Files and Problems
  • Counties, Clerks, and Court Locations
  • Creating a New Case File
  • Creating a New Client (Part 1 of 2)
  • Creating a New Client (Part 2 of 2)
  • Creating and Assigning Reviews to a User Group
  • Daily Dashboard
  • Editing Bad Phone Numbers and Addresses
  • Favorites Feature
  • Field Change History (Audit Log)
  • File Status Codes
  • File Tags
  • Financial Calculator
  • General Navigation Menus and Buttons
  • Image Sharing
  • Imaging (Paperless Office)
  • Importing New Files
  • Litigation Screens
  • Misapplied Debtor Payments
  • Opponent Declares Bankruptcy Procedure
  • Opposing Attorneys
  • Payment Arrangements
  • Renumbering or Deleting a Case File
  • Returned Mail Feature
  • Status Bar
  • Understanding Settings Hierarchy
  • User Preferences
  • Workflows

Security

4
  • External Users
  • Resetting Passwords
  • Security Features
  • Two-Factor Authentication

Add-Ons

3
  • Adding an Enhanced Email Signature
  • Enhanced Email Automation
  • Microsoft Outlook Add-On

Document Management

11
  • Adding a Signature
  • Advanced Document Generation
  • Basic Document Generation
  • Batch Documents
  • Building Document Expressions
  • Creating Spreadsheet Templates
  • Document Fragments
  • Document Generation Selection Options
  • Document Letterheads
  • Document User Prompts (Ask Fields)
  • Merging PDF Templates

Accounting

23
  • Accounting Reports
  • Adding Costs and Expenses to Retain
  • Adding Wage and Bank Garnishments
  • Adjusting Commercial Rates and Suit Fees
  • Balance Calculation Basics
  • Changing Print Scale When Printing Checks in CMPOnline
  • Contingency Rates and Buckets
  • Entering a Balance Adjustment
  • Entering and Printing Checks
  • Entering Client Invoice Payments and Unpaying Bills
  • Entering Deposits
  • Financial Calculator
  • Generating a Client Remittance Report
  • How to Set Up and Enter Hourly Billing
  • Misapplied Debtor Payments
  • Post Direct Payment to Client
  • Preparing and Finalizing Bills
  • Searching for Checks
  • Transactions Check Register
  • Transferring Funds
  • Trust Account Reconciliation Procedure
  • Unfinalizing, Editing, and Reprinting Bills
  • Void Checks

Preferences

4
  • Adding Top Buttons to Grids
  • Enabling Pop-Ups
  • Resetting Passwords
  • User Preferences

Administration

16
  • Abbreviations
  • Adding a Legal Status
  • Adding and Using Review Codes
  • Adding New Activity Codes
  • Assigning Attorney Bar Numbers
  • Automations
  • Batch Internal Status Updates
  • Company Settings: Company Tab
  • Customizing Case Types
  • Image Restore
  • Reassigning Reviews, System Users, and Default Users
  • Renumbering or Deleting a Case File
  • Resetting Passwords
  • Status Bar
  • Terminology
  • User Defined Fields

Tools

5
  • Adding a Legal Status
  • Custom Reporting
  • Importing Batch Images
  • Importing New Files
  • Reassign or Copy Custom Reports

CMPOnline Support

1
  • SOS Support Line Access Instructions
View Categories

Entering a Balance Adjustment

AI Doc Summarizer Doc Summary
AI Doc Summarizer Thinking Thinking

Overview

This guide explains how to create and manage balance adjustments within CMPOnline. Balance adjustments allow users to manually correct or update case file financial records. Available Transaction Codes populate based on the selected Transaction Type, both of which are fully customizable to align with your firm’s specific business needs.

How to Enter a Balance Adjustment

  • Navigate to Case File > Financial > Transactions or Case File > Financial > Balance (if enabled).
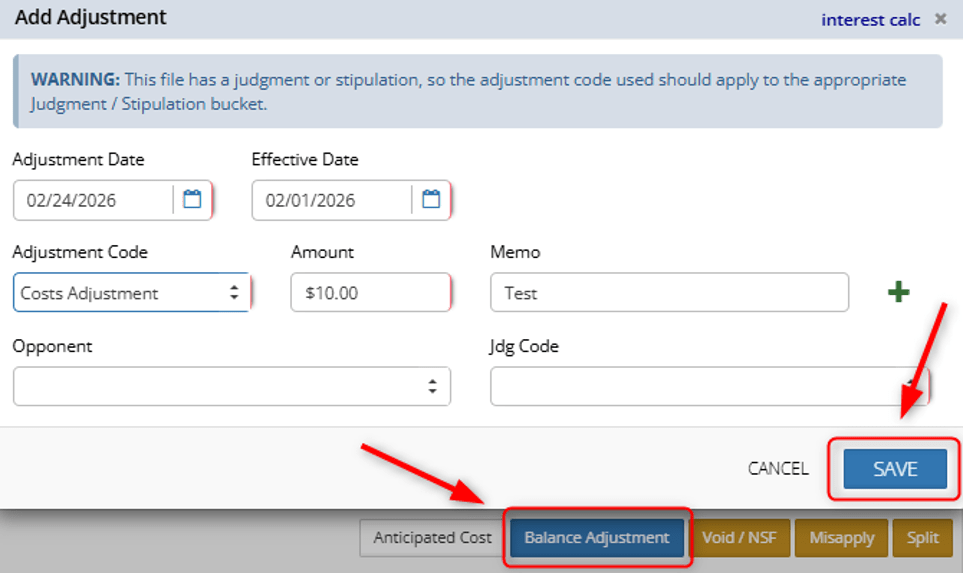
  • Click the Balance Adjustment button at the bottom right of the transaction grid or bottom left of the balance screen (if enabled).
  • Fill in the appropriate fields:
    • Adjustment Date: The date the adjustment is being recorded.
    • Effective Date: The date the financial change should take effect for accounting purposes.
    • Adjustment Code: Select the appropriate transaction code for this balance adjustment.
    • Amount: Enter the numerical value of the adjustment.
      Note: Entering a positive number will decrease the balance, while entering a negative number will increase the balance.
    • Memo (Optional): Add any internal notes or explanations regarding the adjustment.
    • Opponent (Optional): Link the adjustment to a specific opponent if applicable.
    • Judgment Code: If the adjustment relates to a specific legal judgment, select the corresponding code here.
      Note: this dropdown will only show if there are multiple judgments on a file.
  • If you have more than one adjustment to record, click the green plus (+) button to add another line to the popup.
  • Once all information is entered, click Save to post the adjustment(s) to the case file.
CMPOnline Financial Balance Adjustments

Interest Calc (Optional)

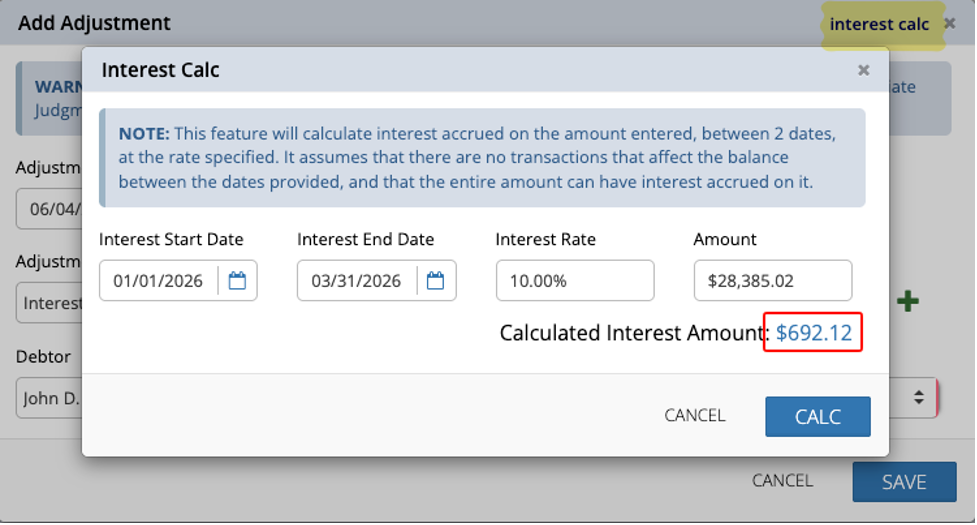
Located in the top-right corner of the balance adjustment window, the Interest Calc link allows you to calculate accrued interest on a specific amount between two dates at a designated rate.

To apply the calculated interest to your balance adjustment entry, simply click directly on the generated interest amount.

Note: This calculation assumes the full balance remains constant and that no other transaction activity occurs between the specified start and end dates.
Enter and manage balance adjustments in CMPOnline

Entering Balance Adjustments Video Highlight

Share This Help Document:

  • Facebook
  • X
  • LinkedIn
Table of Contents
  • Overview
  • How to Enter a Balance Adjustment
  • Interest Calc (Optional)
  • Entering Balance Adjustments Video Highlight

CMPOnline by Case Master Pro
P.O. Box 252
Georgetown, FL 32139
phone: (386) 675-0177

Contact Us

  • Facebook
  • LinkedIn
  • YouTube
  • Twitter
  • RSS

Software Features

  • Case Management
  • Billing & Accounting
  • CMP Imaging
  • Administration
  • Reporting
  • Document Management
  • Software Integration

Add-on Features

  • Email Automation
  • Payment Processor Integration
  • Client Dashboard
  • Payment Dashboard
  • Outside Counsel Login
  • EDI Interfaces
  • Direct Check Module
  • Data Conversion

Discover the Features Every Law Firm Needs

  • About Our Legal Case Management Software Company
  • Case Management Software
  • Debt Collection Software with Custom Reporting
  • Legal Billing Software
  • Legal Software Administration
Copyright © 2005-2026 Case Master, Inc. All rights reserved.