Overview
At Case Master Pro, protecting your data is our top priority. This document provides a comprehensive overview of the security features available in CMPOnline. We’ll walk you through key components such as user groups, permission settings, and system-wide security access controls. Our goal is to ensure you have the tools and knowledge to manage access effectively and maintain a secure environment for your firm’s sensitive information.
To start, rest assured that your site is protected by a DigiCert SSL certificate, ensuring that all communication between your browser and our server is encrypted. Additionally, our server is fully PCI compliant, safeguarding any sensitive data stored in your database. User passwords are securely hashed before storage, preventing reverse engineering or unauthorized access.
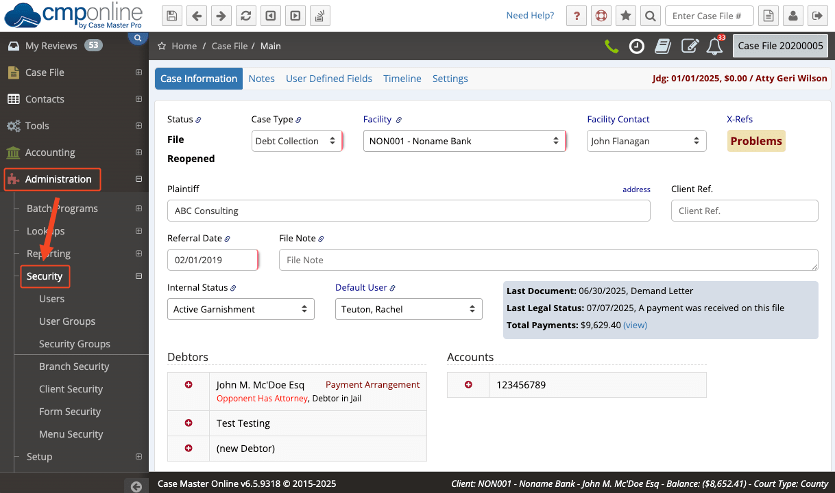
All security settings can be found under the Administration Menu in the Security submenu.

Users
- Add, change, or delete system users.
- Set usernames, assign security groups, and determine if a user is an administrator.
- Send password reset links to users via their configured email addresses.
- Configure existing individual user settings by selecting a user and clicking the “Edit” button.
Note: You can also double click to enter the settings screen for the user.
Keep in mind, all users must be authorized by a CMP Administrator to ensure proper setup and billing.
User Groups
User Groups configure which dropdown menus a group of users will appear in throughout the system. For example: an Attorney user will likely need to appear in all dropdown menus available throughout CMPOnline.

Security Groups
Security Groups allow credentials to be configured for a group of users at once. For example: A Supervisor will likely be marked as an administrator, while an Employee might not be given access to administrative permissions. This explains why some users may have more or less privileges than others.
Branch Security Tab
Branch Security gives you the ability to allow or deny access to files for users on a branch basis.
- Select “User Level Security” or “Group Level Security” accordingly
- Click Add New
- Select a user
- Choose Deny or Allow
- Select the branches to apply this setting
- If “Deny” is selected, the user can only access files marked with the selected branches
- If “Allow” is selected, the user is restricted from files marked with the selected branches
NOTE: Users who are administrators, or belong to an administrator system group, have access to ALL branches. User-level security overrides group-level security. Changes to Branch Security do not take effect until the user (who was updated) logs out of the application.
Client Security Tab
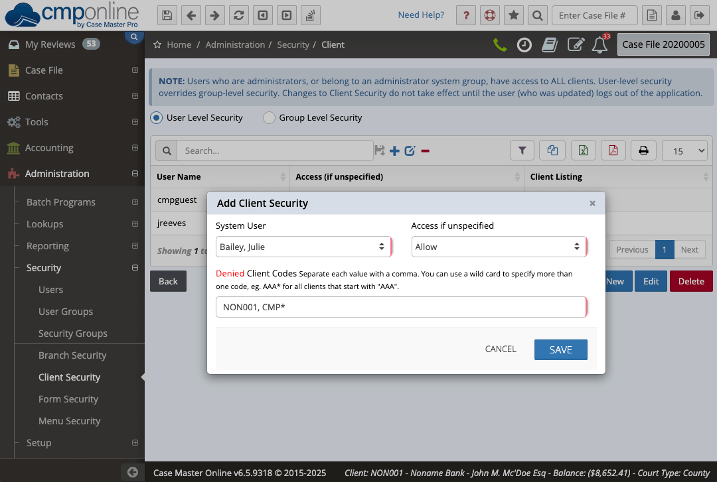
Client Security allows specific users or user groups to access designated client files.
- Click Add New
- Select a user
- Choose to Allow or Deny access
- List the applicable clients
Note: This feature is optional and may not be used by all firms.

Form Security Tab
Form Security controls access to fields within a form.
- Select a form and a field
- Set whether the field is visible or enabled
- Not enabled = read-only
Menu Security Tab
Menu Security controls visibility of items in the left-hand navigation menu.
- Allow or deny menu access for users or user groups.
Note: Security set on a parent menu item applies to its child menus.
Important Notes
Administrators or users in an administrator group bypass all security and have full access.
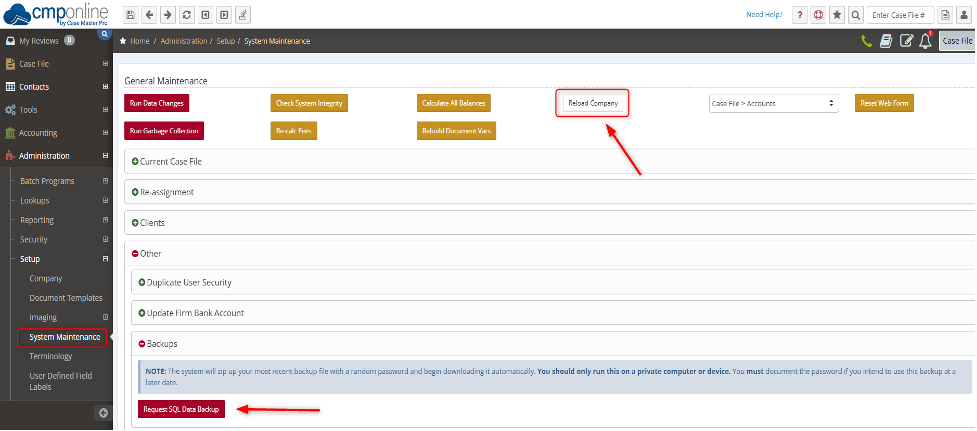
You must reload the company to apply changes.
- Go to Setup > System Maintenance
- Click Reload Company
NOTE: We recommend that affected users log off and back in after any changes to security settings.

Backing Up Your Data
To request a data backup.
- Go to Administration > Setup > System Maintenance.
- Click the Request SQL Data Backup button at the bottom of the screen.
- A password-protected ZIP file will automatically download
- Be sure to record the provided password. We recommend saving it in a Word document or text file with today’s date for future reference.


