Overview
This document details how to enter invoice payments in CMPOnline as well as unpay bills. This document requires access to the CMPOnline accounting menus. If you do not have access to these menus, please contact a CMPOnline administrator or representative.
Entering Invoice Payments
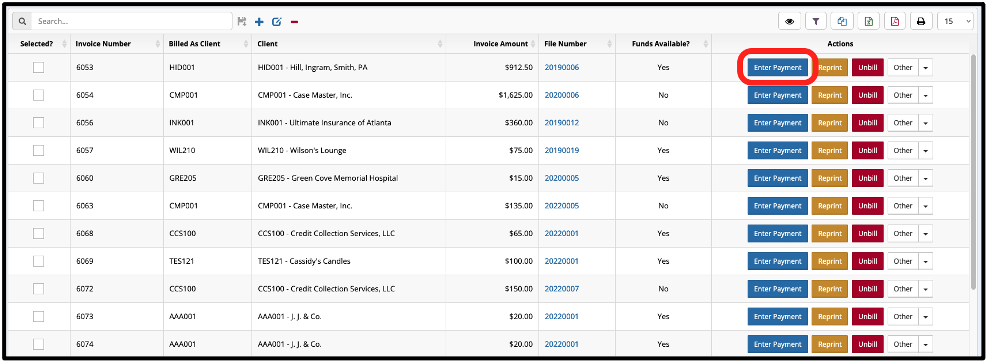
- Navigate to Accounting > Billing > Open Bills.
- Search for the invoice you wish to pay by either searching within the search bar, scrolling, or using the column filter button.
- Once you have located the invoice you would like to pay, click “Enter Payment”.

- Ensure all automatically populated fields are correct, including Client, Invoice Number(s), Paid Date, and Amount Paid.
- Enter a Payment Reference if needed.
- If the client payment is to be deposited into a trust or operating account that is reconciled in CMPOnline, click the “Create Deposit?” box.
- When the ‘Client Approved Payment from Retainer’ is selected, Checks will automatically be entered to reimburse the firm for costs, fees, and taxes (if the ‘Retainer Payment’ transaction types / codes are properly configured on the Transaction Type setup).
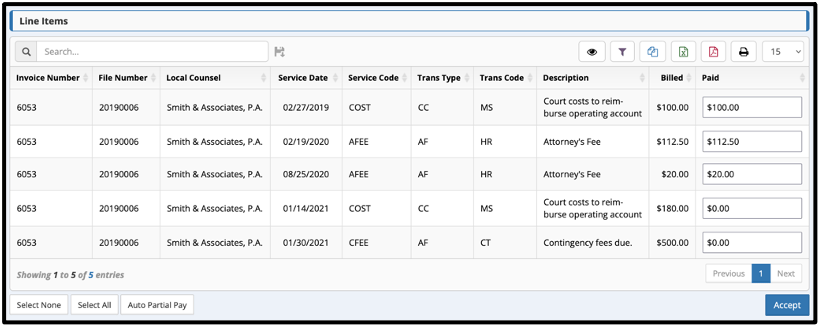
- If you are not paying the invoice in full, use the line items below to update which items are to be paid in part or in full. (See below for more detail on partial payments.)
- Once done, ensure all is accurate and click “Accept”.
Partial Payments
Once you have begun paying a bill, you may only want to enter a partial payment. CMPOnline offers two main ways to help you accomplish this.
First, you can enter the payment amounts for each line item separately, as seen below. This method should be used if you wish to pay specific line items before others.

As seen in the image, the top three line items are fully paid, while you can use the boxes to the right to specify the amount to pay for each of the bottom two items. As you do this, you will see the “Amount Paid” field automatically update.
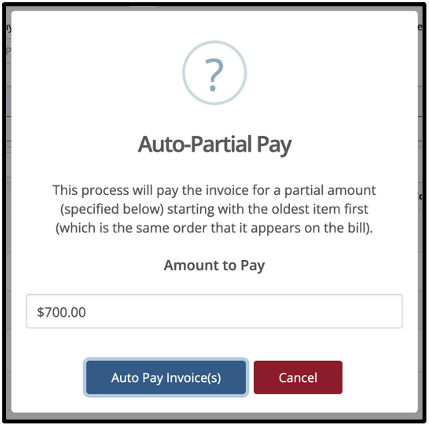
Second, you can use the Auto Partial Pay feature, which allows you to enter the amount you wish to pay for an invoice, even if it is not the full amount, and CMPOnline will automatically disperse the amount between line items, starting at paying the oldest first.

Unpaying Bills
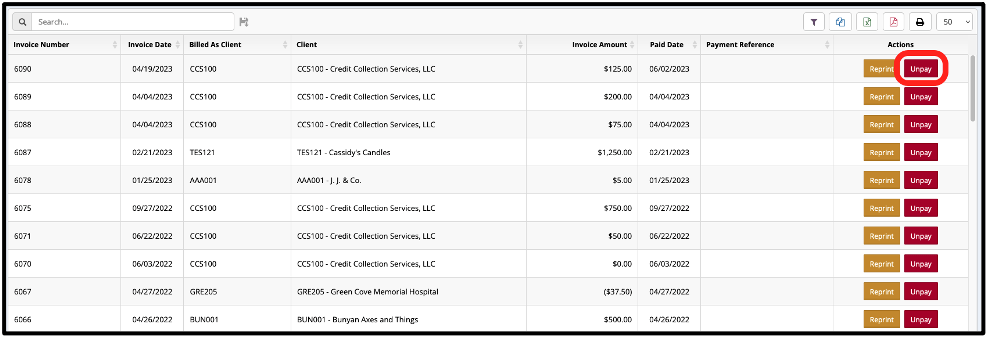
- Navigate to Accounting > Billing > Paid Bills.
- Search for the invoice you wish to unpay by either searching within the search bar, scrolling, or using the column filter button.
- Click “Unpay”.

- Ensure the Client and Invoice Number are correct.
- Select which of the line items you wish to unpay using the far left column.
- Click “Unpay”.
Billing at the Case File Level
Once any of these steps have been completed, it is recommended that you double check your actions at the case file level. To do this:
- Navigate to Case File > Financial > Billing.
- Select the screen you wish to review, Unbilled, Billed, Paid, or Voided.
- Use the grid provided to ensure all bills are located in the correct area within CMPOnline. If you have any questions as to why a bill is not in the correct location, please contact a CMPOnline representative.


