Case Master Pro
  • Home
  • Software Features
    • Case Management
    • Billing & Accounting
    • CMP Imaging
    • Administration
    • Security
    • Reporting
    • Document Management
    • Software Integration
  • Add-ons
    • Email Automation
    • Integrated Payments
    • Client Dashboard
    • Payment Dashboard
    • Outside Counsel Login
    • EDI Interfaces
    • Direct Check Module
    • Data Conversion
  • Resources
    • Help Documentation
    • Help Videos
    • Support
    • Debt Collection Blog
    • Software Enhancements
  • About Us
    • About Case Master Pro
    • Testimonials
    • Contact Us
  • Free Demo
Select Page

General Case Management

29
  • Abbreviations
  • Adding a Legal Status
  • Adding an Opponent / Debtor
  • Adding and Using Review Codes
  • Adding Hold Codes
  • Adding Multiple Images to an Activity Note
  • Adding New Activity Codes
  • Adding Payment Arrangements
  • Adding Wage and Bank Garnishments
  • Additional Opponent / Debtor Screens
  • Case File Basics
  • Counties, Clerks, and Court Locations
  • Creating a New Case File
  • Creating a New Client (Part 1 of 2)
  • Creating a New Client (Part 2 of 2)
  • Daily Dashboard
  • Editing Bad Phone Numbers and Addresses
  • Favorites Feature
  • File Status Codes
  • General Navigation Menus and Buttons
  • Image Sharing
  • Imaging (Paperless Office)
  • Importing New Files
  • Litigation Screens
  • Opponent Declares Bankruptcy Procedure
  • Opposing Attorneys
  • Status Bar
  • Understanding Settings Hierarchy
  • Workflows

Security

3
  • External Users
  • Resetting Passwords
  • Two-Factor Authentication

Add-Ons

2
  • Adding an Enhanced Email Signature
  • Microsoft Outlook Add-On

Document Management

10
  • Adding a Signature
  • Advanced Document Generation
  • Basic Document Generation
  • Batch Documents
  • Building Document Expressions
  • Creating Spreadsheet Templates
  • Document Fragments
  • Document Generation Selection Options
  • Document User Prompts (Ask Fields)
  • Merging PDF Templates

Accounting

13
  • Accounting Reports
  • Adding Wage and Bank Garnishments
  • Adjusting Commercial Rates and Suit Fees
  • Balance Calculation Basics
  • Contingency Rates and Buckets
  • Entering and Printing Checks
  • Entering Client Invoice Payments and Unpaying Bills
  • Generating a Client Remittance Report
  • How to Set Up Hourly Billing
  • Preparing and Finalizing Bills
  • Searching for Checks
  • Transactions Check Register
  • Void Checks

Preferences

3
  • Adding Top Buttons to Grids
  • Enabling Pop-Ups
  • Resetting Passwords

Administration

14
  • Abbreviations
  • Adding a Legal Status
  • Adding and Using Review Codes
  • Adding New Activity Codes
  • Assigning Attorney Bar Numbers
  • Automations
  • Batch Internal Status Updates
  • Company Settings: Company Tab
  • Image Restore
  • Reassigning Reviews, System Users, and Default Users
  • Resetting Passwords
  • Status Bar
  • Terminology
  • User Defined Fields

Tools

4
  • Adding a Legal Status
  • Custom Reporting
  • Importing Batch Images
  • Importing New Files

CMPOnline Support

1
  • SOS Support Line Access Instructions
View Categories

Creating Spreadsheet Templates

Overview

In this document, we’ll be looking at creating spreadsheet templates in CMPOnline. This process is very similar to creating letter templates in CMP, so if you have not already viewed our Document Generation Basics help file and Advanced Document Generation help file, we recommend you review those before continuing.

Creating the Template

  • Navigate to Administration > Set Up > Document Templates.
  • Click Create New XLSX or upload your existing spreadsheet and double click to edit.
  • Begin creating your spreadsheet by selecting the cell you would like to insert your merge field into. From there, use the merge field list to the left and double click to insert fields into the spreadsheet.
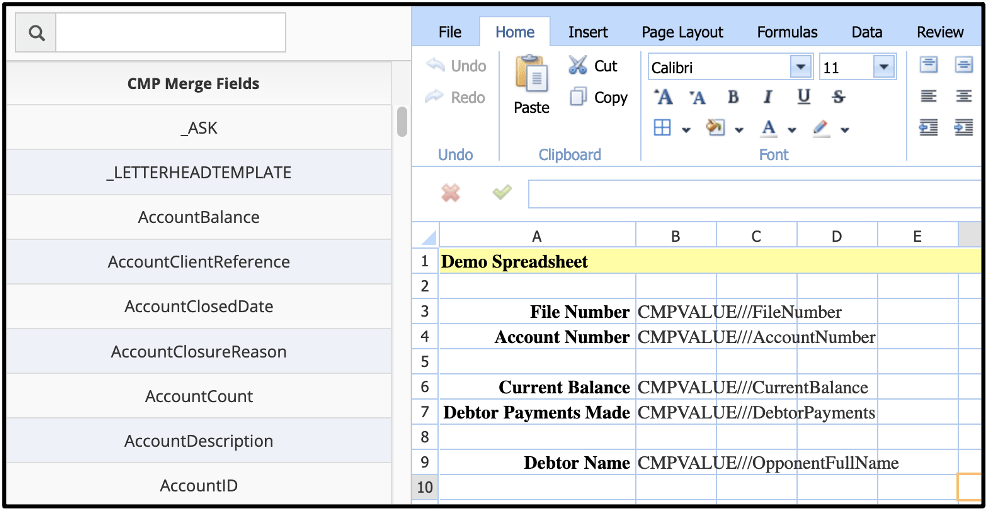
  • You may also format your spreadsheet any way you would like, similar to the way you would in Microsoft Excel.
  • Once done, click File, then Test Document.
  • If your spreadsheet looks correct, continue to the next step. If not, make any changes needed, then test again.
  • Click Save As, give your spreadsheet a name, and click save.
  • You may now add this spreadsheet to a package, as detailed in our Basic Document Generation help file.

Creating Spreadsheet Templates Video Highlight

Document Integration, Document Merge, Documents, Microsoft Excel
Share This Help Document:
  • Facebook
  • X
  • LinkedIn
Table of Contents
  • Overview
  • Creating the Template
  • Creating Spreadsheet Templates Video Highlight

CMPOnline by Case Master Pro
P.O. Box 252
Georgetown, FL 32139
phone: (386) 675-0177

Contact Us

  • Facebook
  • LinkedIn
  • YouTube
  • Twitter
  • RSS

Software Features

  • Case Management
  • Billing & Accounting
  • CMP Imaging
  • Administration
  • Reporting
  • Document Management
  • Software Integration

Add-on Features

  • Email Automation
  • Payment Processor Integration
  • Client Dashboard
  • Payment Dashboard
  • Outside Counsel Login
  • EDI Interfaces
  • Direct Check Module
  • Data Conversion

Discover the Features Every Law Firm Needs

  • About Our Legal Case Management Software Company
  • Case Management Software
  • Debt Collection Software with Custom Reporting
  • Legal Billing Software
  • Legal Software Administration
Copyright © 2005-2025 Case Master, Inc. All rights reserved.