This document details advanced procedures to generate documents in CMPOnline.
If you have not already, read through our Basic Document Generation help file or watch our Basic Document Generation YouTube tutorial, as they both go over setting up a template which will not be covered in this document.
Document Packages
Document packages are at the core of document generation in CMPOnline. Used to their fullest, document packages can set up one or more templates based on specified conditions, as well as automatically add billing, cost checks, and reviews to the file.
Navigate to Administration > Lookups > Document > Document Packages and either add a new package or edit an existing package. The document package details has the following fields:
- Description: The name of your package.
- Type: Letter or Pleading to show up on your Case File > Main screen.
- Category: To keep your documents organized.
- Billing Code: Add billing to the case file when the package is generated.
- Select a Billing Code. NOTE:
- Billing codes must have a default time specified in its setup, under Administration > Lookups > Financials > Service Codes.
- For the billing code to work correctly, the client must also be configured with an hourly rate, under Contacts > Clients > Billing Settings.
- Select a Billing Code. NOTE:
- Image Description: This is required to add the document to imaging with a single click after generation.
- Popup Message: To appear when the document package is generated.
Combine Components During Merge: Allows you to combine all components into one single document when merged.
NOTE: If the package contains both docx and pdf components, only the same file types will merge together after generation.
Components
This is where you will select which templates will be packaged together and any possible conditions that may arise.
- Conditions:
- If there is no condition, the template will generate every time.
- If there is a condition, the template will only generate when the condition is true.
- Conditions use the same fields as the document merge fields seen when creating a template.
- Conditions follow the syntax of [ExampleField] == “Example”, where the field is in brackets and the filter is in quotations. (Example: [OpponentState]==”FL” means the opponent state is equal to Florida and [OpponentState]!=”FL” means not equal to).
- Conditions can also be chained together using “&&” for AND and “||” for OR. (Example: [OpponentState]==”FL” || [OpponentState]==”AL”).
- It is a good idea to test conditions once done to ensure accurate results by clicking the “Test” link. This will test the expression using data for the currently loaded case file.
Reviews to Add
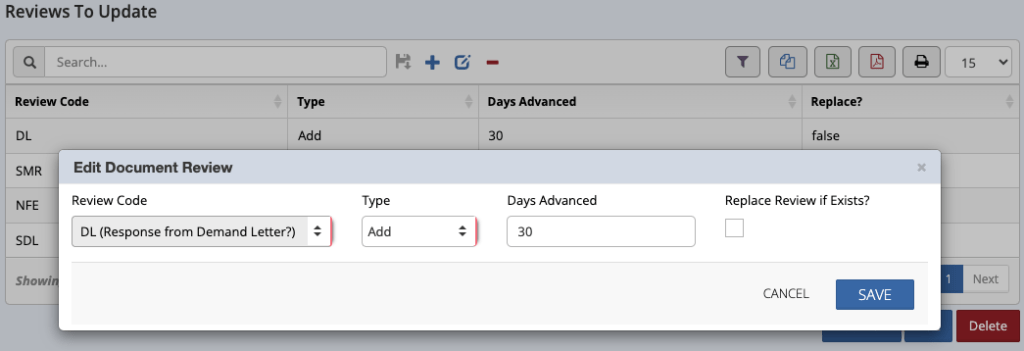
Reviews can be added to a file to track when another action needs to be taken, based on the action of generating a document.
- Select Add New:
- Select a review type
- Select add or remove
- Choose Days Advanced if it applies
- It is imperative to ensure you add a review before removing them to ensure no files are without reviews.

Checks to Add
You have the option to add checks to the print queue after a document package has been generated. Simply select Add New and fill in the appropriate transaction details.
Validity Checks
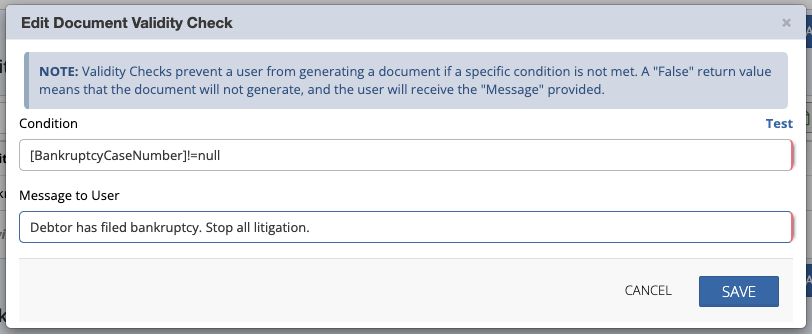
Validity Checks prevent a user from generating a document if a specific condition is not met. A “False” return value means that the document will not generate, and the user will receive the “Message” provided.

Generating Documents
You need to “Always Allow Pop-ups” from this domain for document generation to work correctly. For more information about allowing pop-ups, please refer to our Enabling Pop-ups help document.
- Navigate to Case File > Documents
- If you are only testing the documents, ensure that “Auto-Verify” is not checked in the top left of the window. (See Verifying Documents below for more information.)
- Select the document package you wish to generate.
- Select the Account and Opponent
- If left blank, the first account and first opponent will automatically be selected.
- Click Generate Document
- Once the document is generated, you can:
- Edit
- Save
- Send to Imaging
Verifying Documents
Document verification is a feature in CMPOnline that allows for further control over system generated activities, reviews, and more when generating documents. If document verification is enabled, users have the option to verify documents manually, meaning, users are able to review documents for accuracy before any actions attached to the document package are run.
These actions may include:
- Adding or Removing Reviews
- Adding Checks to a Case File
- Adding Billing to a Case File
- General File Footprints are Added
If you see the “Test Document” option next to “Add to Batch Docs” on the Case File > Documents screen:
- No further action needs to be taken.
If you see the “Auto-Verify” checkbox next to “Open in Word?” on the Case File > Documents screen:
- Check to see if the “Auto-Verify” checkbox is selected. If it is, your document was automatically verified upon generation and no further action needs to be taken.
- If the checkbox is not selected and you wish to verify your generated documents, navigate to Tools > Verify Documents, select the documents you wish to verify, then select “Verify” in order for reviews, checks, billing, and file footprints to be added to your case file.


